D.I.Y DAMP COURSING APPLICATION INSTRUCTIONS
The Tech-Dry applicator kit makes it easy to install a damp course into single and double brick walls.
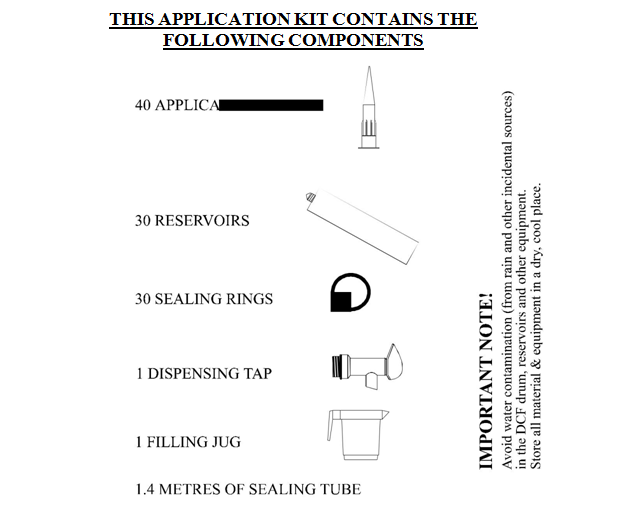
Each kit contains enough re-useable applicators to treat 3 metres of single brick wall (or 1.5 metres of double brick wall) at one time.
Filling each reservoir with 150ml of DAMP COURSING FLUID is enough to thoroughly saturate a single brick thickness of wall.
Follow the step-by step instructions outlined below.
It is strongly recommended that you first attempt an installation on two bricks to ensure that you have the correct technique for your wall and brick type!
CORRECT HOLE SIZE
It is important that you drill the correct diameter hole in the bricks, this will provide a leak-free seal between the hole and the applicator nozzle.
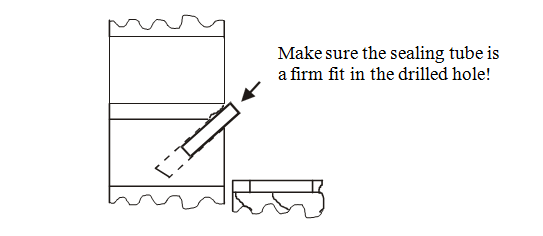
The aim is to produce a hole that provides a snug, push fit, of the sealing tube inside the hole (as shown below). The correct hole diameter is generally 10mm. If you have very soft bricks you may need to drill 9mm, if you have very hard bricks you may need to drill 11mm.
In any case a snug fit of the sealing tube inside the hole is required.
DRILLING METHODS
The drilling method varies slightly depending on the type of bricks present. Select the type of bricks and drilling method from the list below.
VERY SOFT AND NOT SO WET BRICKS
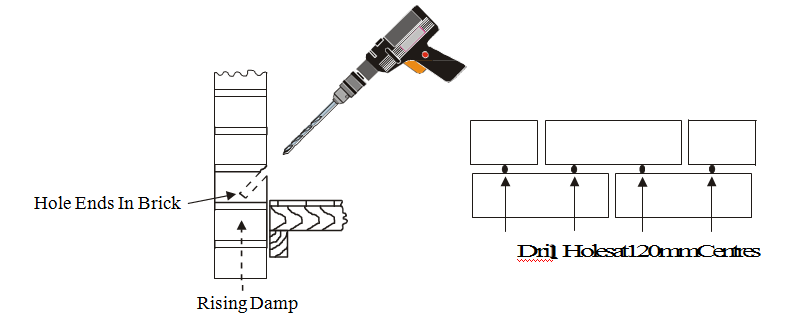
These types of bricks are usually found in Victorian houses. The bricks are easy to drill and the drill dust comes out of the hole as a dry dust (it is not wet enough to form clumps when squeezed in the hand).
- Carefully remove the skirting boards from the wall using a flat pinch bar.
- Remove any render covering the lowest course of bricks so that the entire brick face and surrounding mortar is clearly visible.
- Using a 10mm diameter masonry drill bit (see section entitled “CORRECT HOLE SIZE” above), drill two blind holes in each brick at floor level using a sturdy hammer drill. The holes should start at the mortar line level and be drilled down into the brick at an angle of approximately 45 degrees. The spacing of the holes along the wall should be 120mm as shown below. The depth of the holes should be about 90mm, take care not to drill through or break the brick. If a hole is inadvertently drilled through the brick, a new hole should be drilled beside it.
Remove the dust from the holes using a vacuum cleaner.
VERY HARD OR WET BRICKS
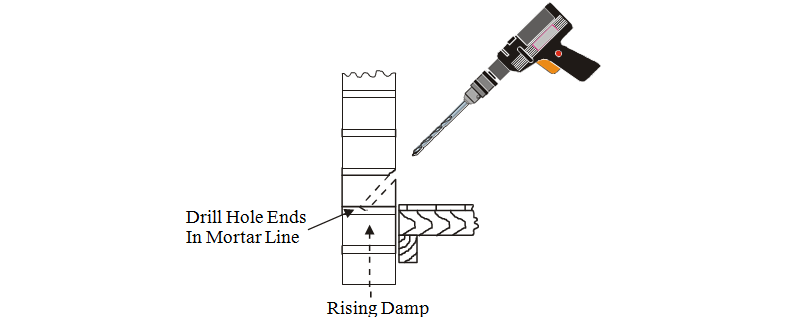
If you have soft bricks, which are very wet (the drilling dust does not look like a free-flowing dust but clumps together), use this drilling method. This method should also be used for very hard bricks. Very hard bricks are found in houses built from about 1900 to the present. Clinker bricks and pressed clay bricks are hard bricks.
- Carefully remove the skirting boards from the wall using a flat pinch bar.
- Remove any render covering the lowest course of bricks so that the entire brick face and surrounding mortar is clearly visible.
- Using a 10mm diameter masonry drill bit (see section entitled “CORRECT HOLE SIZE” above), drill two blind holes in each brick at floor level using a sturdy hammer drill. The holes should start at the mortar line level and be drilled down through the brick until the drill bit reaches the mortar line below. The hole should end in the mortar line halfway through the thickness of the wall. Drill at an angle of approximately 45 degrees. The spacing of the holes along the wall should be 120mm. Remove the dust from the holes using a vacuum cleaner.
NOTE: If mortar is missing between bricks, re-mortar the missing areas, let the mortar set, and proceed with the damp coursing.
WIRE CUT BRICKS
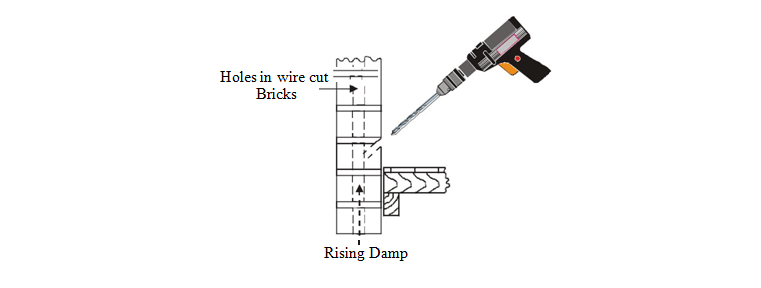
Wire cut bricks are bricks with holes in them. These types of bricks are commonly found in properties built after about 1970. These bricks are usually found in brick veneer construction or on the outside leaf of cavity walls. The method of drilling for this type of brick is as follows:
- Remove any render covering the lowest course of bricks so that the entire brick face and surrounding mortar is clearly visible.
- Using a 10mm diameter masonry drill bit (see section entitled “CORRECT HOLE SIZE” above), drill two holes in each brick at floor level using a sturdy hammer drill. The holes should start at the mortar line level and be drilled until the drill bit enters the holes in the bricks. The drilling angle should be approximately 45 degrees from the horizontal. The spacing of the holes along the wall should be 120mm, roughly 2 per brick.
WALL TYPES
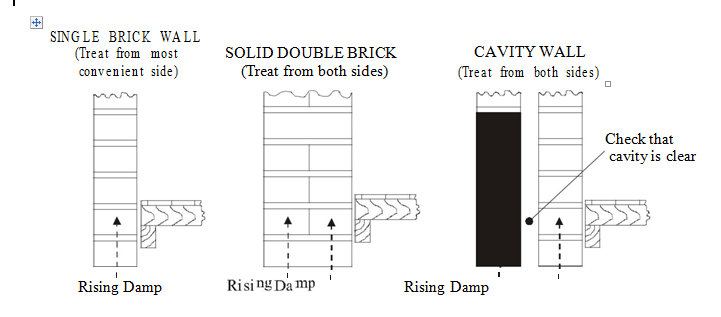
There are three types of wall that can be treated with the Tech-Dry D.I.Y. system. The walls are single brick, solid double brick and cavity wall (shown below). Single brick walls can be treated from the most convenient side. Solid double brick and cavity walls must be treated from both sides.
INSTALLING THE APPLICATORS AND APPLYING THE DCF
INSTALLING THE RESERVOIRS
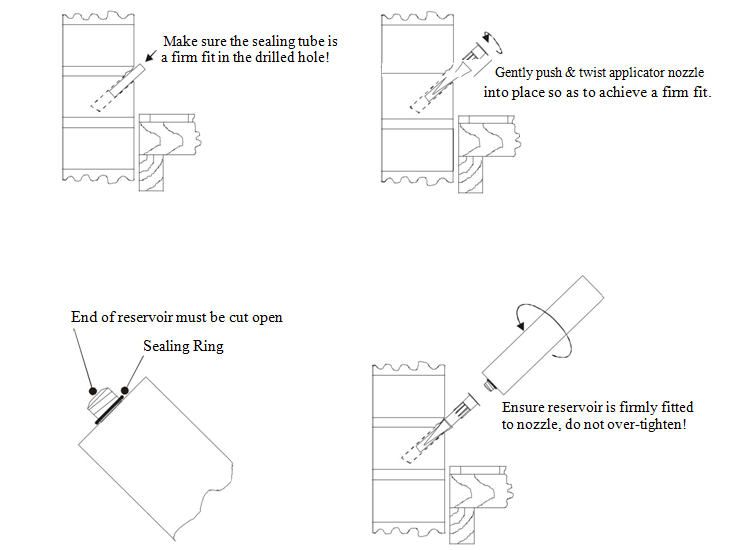
- A coil of sealing tube has been supplied. This should be cut into 40 mm lengths and pushed 20mm into the drilled hole. The tube should be a snug fit in the hole (see section entitled “CORRECT HOLE SIZE”).
- Push and turn the applicator nozzle into the tube fitted into the drilled hole. The tapered nozzle should wedge into the inside of the tube, forming a seal that stops the leakage of fluid.
- Using a sharp knife cut off the conical section of the reservoir end so that the DAMP COURSING FLUID can flow into the applicator nozzle.
- Slip the sealing ring into position over the applicator nozzle as shown in the attached sheet.
This ring stops the reservoir from leaking. - Screw the reservoir firmly into the applicator nozzle. DO NOT over-tighten!
FILLING THE RESERVOIRS
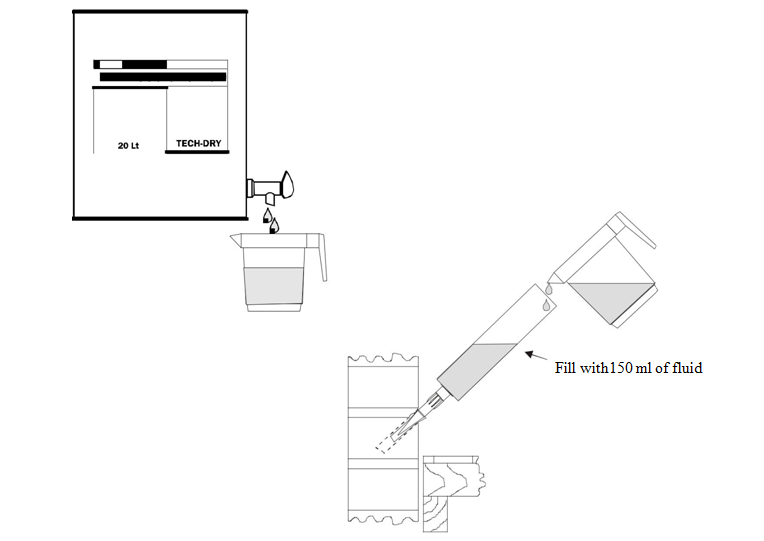
1) Fill each reservoir with 150ml of the DAMP COURSING FLUID using the jug supplied. The fluid level should gradually get lower as the fluid is absorbed into the brickwork. No fluid should be leaking from the seal between the hole and the applicator nozzle or the junction between the application nozzle and reservoir. If a large amount of fluid is leaking from either of these two points, re-set the applicator nozzles and reservoirs as per instructions 1-5 in “Installing The Reservoirs”. If the applicators still leak between the hole and the sealing tube, wrap a few turns of Teflon tape around the sealing tubes so as to form a good seal in the hole.
One 150ml fill of each reservoir normally delivers enough fluid (1.5 litres per metre of single brick wall) to completely saturate a single brick thickness of wall. The DAMP COURSING FLUID should take from 3 hours to 15 hours to completely permeate into the bricks and surrounding mortar. A darkening of the bricks and surrounding mortar marks the progress of the installation.
Where the drill hole ends in the mortar line (as for very hard or wet bricks), fill each reservoir three times with 50ml of the DAMP COURSE FLUID (150ml in total for each reservoir). Only fill a reservoir when the previous 50ml of fluid has drained out of the reservoir. The fluid will run out of the reservoir very quickly, this is normal, as mortar lines are very permeable. There should be a darkening of the entire lower mortar line after a few hours.
Once the DAMP COURSING FLUID has impregnated the bricks in a complete horizontal layer, the wall above this layer will begin to dry out.
REMOVAL OF THE APPLICATOR NOZZLES AND RESERVOIRS
Once the Tech-Dry damp course has been installed into the section of wall, the applicators can be removed.
- Each reservoir should be unscrewed from the applicator nozzle.
- Remove the applicator nozzle from the wall by turning the applicator while gently pulling.
The sealing tube usually remains in the hole and can be removed by pulling it out of the hole with a pair of pliers. - The applicator nozzles and reservoirs can now be re-used on the next section of wall.
The installation of the damp course is now complete and the wall will begin to dry out. Refer to page 2 of the data sheet on DAMP COURSING FLUID for instructions on what to do after the damp course has been installed.

